

Weighted Vest Benefits, Sizing & How to Use One Safely
Understand what added torso weight actually changes, how to choose a sensible starting load, how a weighted vest should fit, and how to use one without progressing faster than your movement can handle.
A weighted vest looks simple: add weight around your torso and make familiar movement harder. But choosing one well has much less to do with finding the heaviest vest you can tolerate and much more to do with choosing useful resistance that stays secure while you move.
Added torso load can make walking, bodyweight exercises, stairs, conditioning work, and other weight-bearing activities more demanding without requiring you to carry a dumbbell in your hands. The important part is deciding whether that extra resistance improves the activity you are doing or simply interferes with it.
That is why this guide starts with benefits and loading principles before getting into vest types. We will look at what weighted vests can reasonably help with, how to think about starting weight, why vest size and vest weight are not the same thing , how a secure vest should fit, and which warning signs suggest that the load may be too aggressive.
Later in the guide, we will compare fixed-weight vests, adjustable models, and plate carriers; walk through a beginner-friendly first session; cover common mistakes; and show how to decide what kind of vest actually fits the way you plan to train.
The Short Answer Before We Go Deeper
On This Page
Use these links to move directly to benefits, starting weight, sizing, safe use, progression, buying guidance, or FAQs.
Is a Weighted Vest Worth Using?
It can be. A weighted vest is most useful when you want to make an activity you already perform well, such as walking or bodyweight exercise, more demanding without holding weight in your hands.
The vest is not automatically better than regular training, and heavier is not automatically more effective. A better starting point is a load that stays secure, lets you move normally, and can be progressed gradually.
ACSM currently suggests roughly 5% of body weight as an initial adaptation reference, not an individualized prescription.
The vest should stay close to your torso without excessive bounce or interfering with normal breathing and movement.
Increase load, session duration, or exercise difficulty separately so you can better judge how the new demand affects the activity.
Added resistance can increase training demand, but a vest by itself does not guarantee fat loss, muscle gain, better posture, or stronger bones.
What Does a Weighted Vest Actually Do?
A weighted vest does not create a new movement. It changes the amount of mass your body has to move through an activity you are already doing.
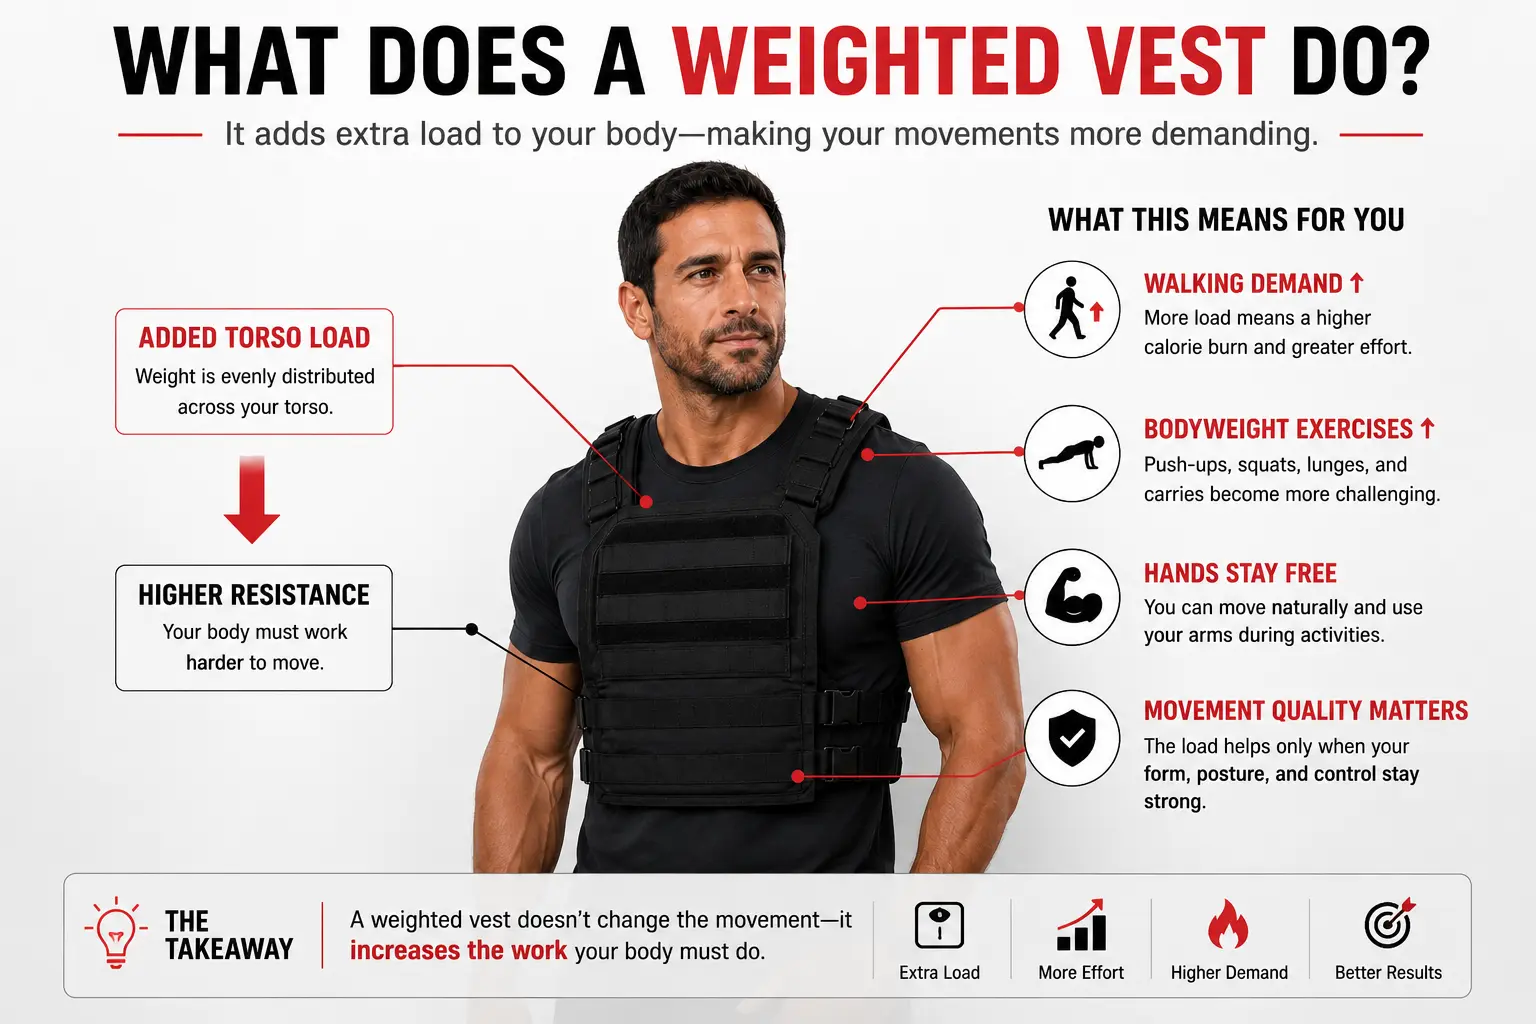
It Adds Resistance Around Your Torso While Keeping Your Hands Free
Put on a weighted vest and your body now has more total mass to move. During walking, that additional load travels with you through every step. During squats, push-ups, stairs, lunges, and other bodyweight movements, you are performing the same basic movement while carrying extra resistance.
That is what makes a vest different from simply holding a dumbbell. Your hands remain available, while the added load stays attached to your torso. A properly secured vest can therefore add resistance without requiring you to change the exercise into a loaded carry.
The effect depends on more than the number printed on the vest. Walking speed, incline, exercise choice, vest fit, load amount, and how well the weight stays secured can all influence how demanding the activity becomes.
Walking with a vest, doing push-ups in one, and running in one are different training situations. The equipment is the same, but the movement, intensity, and progression needs are not.
Weighted Vest vs Dumbbells vs Backpack
All three can add resistance, but they place and manage that resistance differently.
Keeps both hands free and places resistance directly on the body. Stability depends heavily on fit and how securely the vest is adjusted.
Useful for hands-free resistanceResistance is controlled through your grip and arm position. This makes dumbbells useful for many exercises, but your hands are occupied.
Useful for targeted resistanceA backpack or rucksack can carry substantial weight, but the load sits differently and may move more if the pack is not fitted or packed securely.
Useful for loaded walking and ruckingWeighted Vest Benefits: What the Evidence Actually Supports
It Can Make Walking More Demanding
Adding weight to your torso means your body has more mass to move with every step. At the same walking speed, that added load can increase exercise demand compared with walking without the vest.
This is one reason weighted walking appeals to people who already have a comfortable walking routine but want to introduce additional resistance without immediately increasing speed. Incline, pace, vest load, and session length can all change how challenging the walk becomes.
It Can Increase Energy Expenditure
Moving additional mass requires additional work. Weighted-walking research has found that vest loading can increase metabolic cost compared with walking under similar conditions without the added load.
The size of that increase is not fixed. It varies with vest weight, walking speed, incline, body size, fitness level, and the specific protocol being used.
Do not turn one study percentage into a promise for every person or every workout.
It Adds Resistance to Bodyweight Exercises
A vest gives you a simple way to add external resistance to movements that normally rely mostly on body weight. Squats, lunges, stairs, push-up variations, and similar exercises can become more challenging when extra load is added appropriately.
That does not mean every bodyweight exercise needs a vest. If the added load changes technique, limits useful range of motion, or makes the vest unstable, reducing the load may be the better choice.
Added resistance creates another progression option, but good movement still comes first.
Cardiovascular demand, work capacity, and the much more complicated question of bone density.
The Benefits Get More Context-Dependent From Here
Increasing exercise demand is relatively straightforward to measure. Claims about long-term strength, body composition, posture, cardiovascular fitness, or bone health require more context.
It Can Increase Cardiovascular Demand
When you move more mass, the same activity can require more physiological effort. Research on weighted walking shows that increasing vest load can raise metabolic demand and heart-rate response.
That does not mean every weighted-vest session becomes an effective cardiovascular workout. Pace, incline, vest load, exercise choice, fitness level, and session duration all influence the actual training demand.
It Can Add a Functional Strength and Work-Capacity Challenge
A weighted vest can make familiar movements harder by increasing the resistance your body must manage. That makes it useful in some strength, conditioning, stair, loaded-walking, and bodyweight training sessions.
Whether that extra resistance produces measurable strength, power, endurance, or performance gains depends on the overall program. Exercise selection, load, frequency, progression, recovery, and the person using the vest all matter.
Familiar movements can become more demanding without requiring a completely different exercise.
Load can become one variable within a broader progression strategy.
Simply wearing a vest does not guarantee that the training stimulus is sufficient to improve strength.
What About Bone Density?
This is where weighted-vest claims need the most restraint.
Bone responds to mechanical loading, which is one reason weighted vests have been studied in older adults and postmenopausal women. Some structured exercise programs that included weighted vests have reported favorable bone outcomes.
One long-term study, for example, used a weighted vest together with jumping exercise. That matters because the result cannot be treated as proof that simply wearing a vest by itself produces the same effect.
More recent randomized evidence also shows why caution is necessary. In a 2025 trial involving older adults with obesity who lost about 10% of their body weight, daily weighted-vest use did not prevent weight-loss-associated bone loss at the hip.
Weighted Vest Claims: Evidence vs Hype
A useful way to evaluate weighted-vest marketing is to separate effects that can be measured during a workout from outcomes that require longer-term evidence.
| Common Claim | What We Can Reasonably Say | Confidence |
|---|---|---|
| Makes walking harder | Yes. Added load can increase the physical and metabolic demand of walking. | Strong |
| Raises energy cost | Yes. Controlled weighted-walking studies show greater metabolic demand as external load increases. | Strong |
| Builds strength | A vest can provide additional resistance, but strength gains depend on exercise selection, training dose, and progression. | Context-Dependent |
| Improves bone density | Findings vary by population and exercise protocol. Positive results from combined exercise programs do not prove that the vest alone improves bone density. | Mixed |
| Burns body fat | A vest can increase exercise energy cost, but that does not mean wearing one automatically produces body-fat loss. | Indirect Only |
| Fixes posture | A general posture-correcting effect is not established. Poor fit or excessive load may instead interfere with normal movement. | Not Established |
Read “Strong” carefully. It refers to support for the specific immediate effect listed in the table. It does not mean every person will experience the same response or the same long-term outcome.
How Heavy Should a Weighted Vest Be?
For someone adapting to weighted-vest exercise, ACSM recommends roughly 5% of body weight as an initial reference and advises progressing the load gradually. Treat that number as a starting point to evaluate, not as a prescription that automatically suits every person or activity.
The number only matters if you can still move well.
A percentage of body weight gives you a simple reference, but it cannot account for training history, vest design, injury history, movement quality, exercise selection, or how securely the vest fits.
Starting Weight Depends on What You Plan to Do
Walking, strength training, and running create different demands. A load that feels reasonable in one activity can be distracting or excessive in another.
Around 5% Can Be a Sensible Initial Reference
If you already walk comfortably without added weight, a light vest gives you a simpler way to learn how loaded walking feels. Roughly 5% of body weight is a useful reference for that first evaluation.
For a beginner, keep the first loaded sessions shorter than a normal walk. Pay attention to posture, stride, breathing, vest movement, and pressure around the shoulders or torso before considering more weight.
Let Technique Set the Limit
There is no single body-weight percentage that fits every strength exercise. A vest affects a squat, push-up, split squat, stair climb, and pull-up differently.
Start with enough resistance to make the movement meaningfully harder while preserving the range of motion and technique you use without the vest. If technique changes immediately, reduce the load.
Do Not Treat the 10% Column as a Running Target
Running involves faster movement and repeated impact, while giving you less time to correct a vest that shifts or bounces. Added load can also affect fatigue and running mechanics.
If weighted running belongs in your training, use a more conservative approach than you would for slow walking. Establish comfortable unloaded running and stable vest fit before adding meaningful resistance.
In trained trail runners, both 5% and 10% vest conditions shortened time to exhaustion compared with unloaded running. That finding supports caution, not a universal running target.
View the weighted running studyIncrease One Variable at a Time
Make sure the vest stays secure during the activity.
Complete a manageable session without movement deterioration.
Check posture, technique, comfort, and recovery.
Increase resistance only after the current setup feels controlled.
5% and 10% Body-Weight Reference
| Body Weight | 5% Reference | 10% Calculation |
|---|---|---|
| 120 lb | 6 lb | 12 lb |
| 140 lb | 7 lb | 14 lb |
| 160 lb | 8 lb | 16 lb |
| 180 lb | 9 lb | 18 lb |
| 200 lb | 10 lb | 20 lb |
| 220 lb | 11 lb | 22 lb |
| 240 lb | 12 lb | 24 lb |
This is a body-weight calculation reference for general education. It is not an individualized training or medical recommendation.
Pass These Four Checks First
Minimal shifting or bouncing during the activity.
No obvious change in posture, stride, or technique.
You can complete the intended work without form breaking down.
The current load is not creating unusual pain or disrupting your next planned sessions.
Weighted Vest Sizing: How Should a Weighted Vest Fit?
Vest size and vest weight answer two different questions. One determines how the equipment sits on your body. The other determines how much resistance you are carrying. Getting those two decisions mixed up can leave you with the right amount of weight in a vest that does not move well.
Size and Weight Are Not the Same Setting
How the Vest Fits Your Body
Size affects torso coverage, shoulder placement, chest clearance, strap range, and how securely the vest can be adjusted around your body.
How Much Resistance It Adds
Weight determines the external load you carry during walking, strength work, conditioning, or another activity.
A 10-pound vest can still be the wrong vest for you if its torso length, shoulder position, or adjustment range prevents a secure fit.
What a Good Weighted Vest Fit Should Feel Like
The vest should feel secure enough that the load moves with your torso rather than against it. Tightening every strap as far as possible is not the goal.
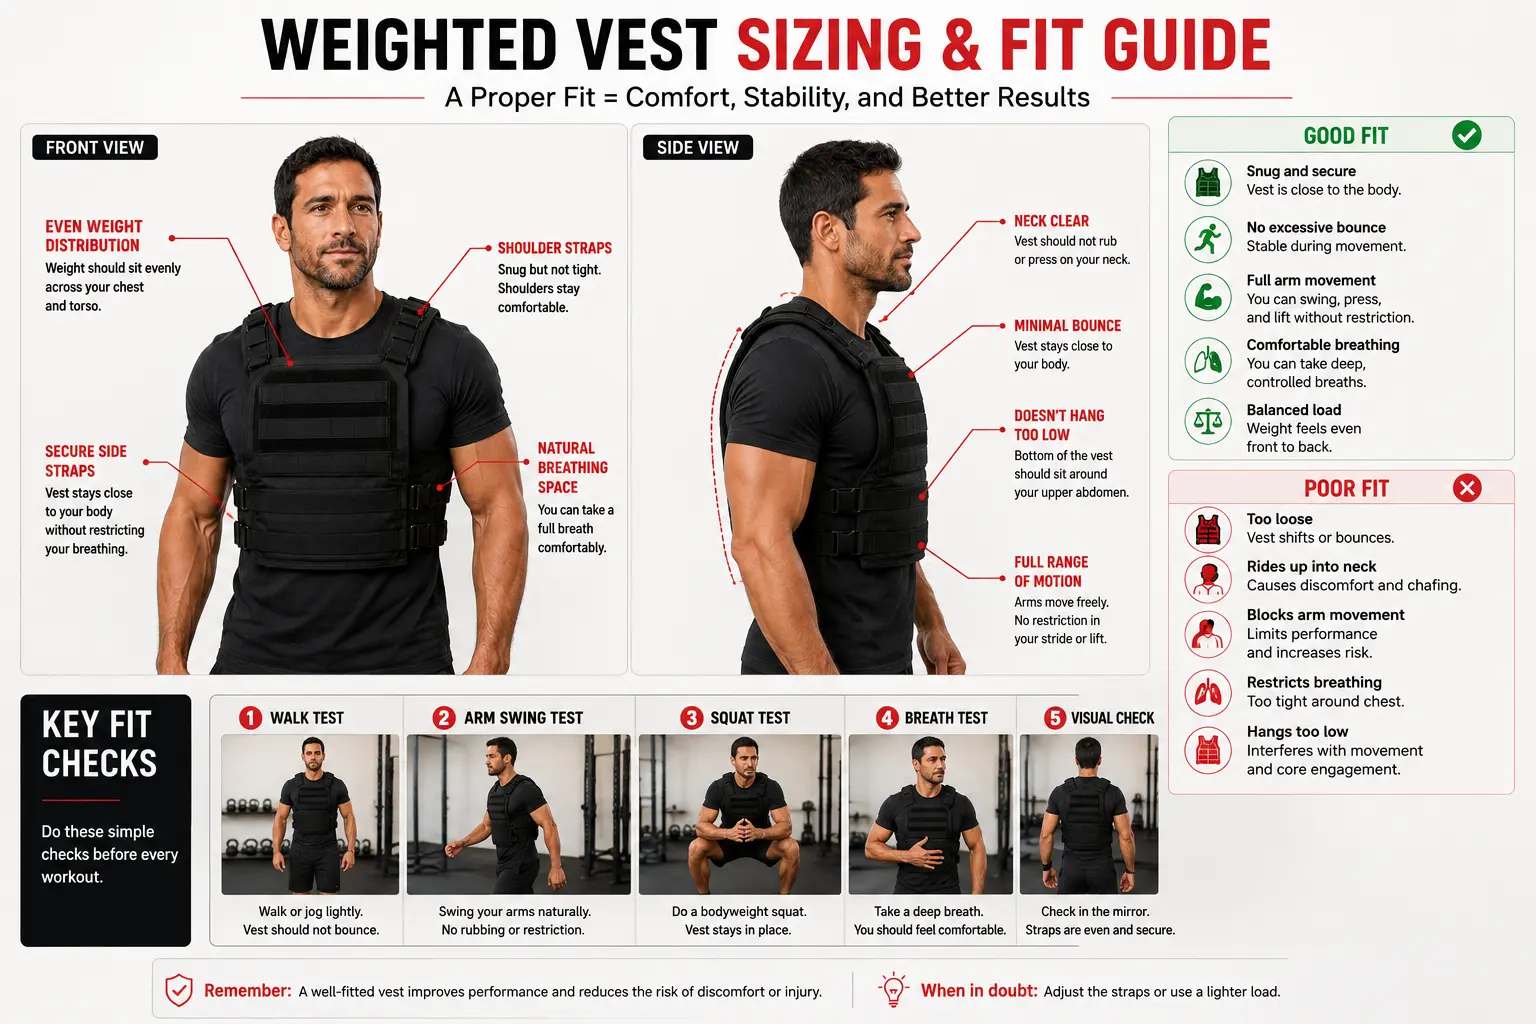
The vest should sit against your body rather than hanging loosely away from it.
The load should not repeatedly lift, drop, or swing during normal movement.
Straps should secure the vest without making normal breathing feel restricted.
Shoulder panels and side straps should not interfere with normal arm movement.
The vest should not ride upward into the neck as you walk, squat, or change position.
Weight should remain where the vest is designed to carry it instead of shifting noticeably side to side.
Three Fit Factors That Product Weight Does Not Tell You
Two people with the same body weight can need a different vest fit because their torso lengths differ. A long vest can interfere with hip movement on a shorter torso, while a very short vest may concentrate the load higher than another user prefers.
Chest shape, shoulder width, waist shape, and overall body proportions affect where a vest sits and how evenly its straps can apply tension.
Some designs offer more contouring or body-specific shaping than others. This is one reason a vest that fits one person well may feel awkward on someone with a similar body weight.
Adjustable shoulder, side, waist, or sternum straps give you more control over where the vest sits. The exact adjustment system varies by design.
More straps are not automatically better. What matters is whether the available adjustments let you secure the vest without creating uncomfortable pressure.
Adjust the Vest Before You Add Intensity
If the vest is adjustable, use a lighter setup while learning how the straps and body position work.
Adjust shoulder height so the vest sits where the design intends without riding into your neck.
Tighten side, waist, or sternum adjustments until movement is stable without excessive compression.
Walk, raise your arms, squat, and take a few deeper breaths before beginning the actual session.
Run a Quick Movement Test
Check for bounce, shifting, or abnormal stride.
Make sure shoulder panels do not block normal motion.
Check whether the lower vest edge interferes with torso or hip movement.
Confirm that the secure fit does not feel restrictive.
Fixed, Adjustable, or Plate Carrier?
Weighted vests can look similar from a distance while managing resistance very differently. Some have a fixed total load, some use removable pocket weights, and others use larger weight plates. Those differences affect progression, profile, convenience, and how the vest feels during movement.
A low-profile vest may still use removable weights. Think of fixed, adjustable, and plate-loaded as ways of managing resistance. Think of low-profile as a design priority that can overlap with more than one category.
Start With How the Resistance Is Added
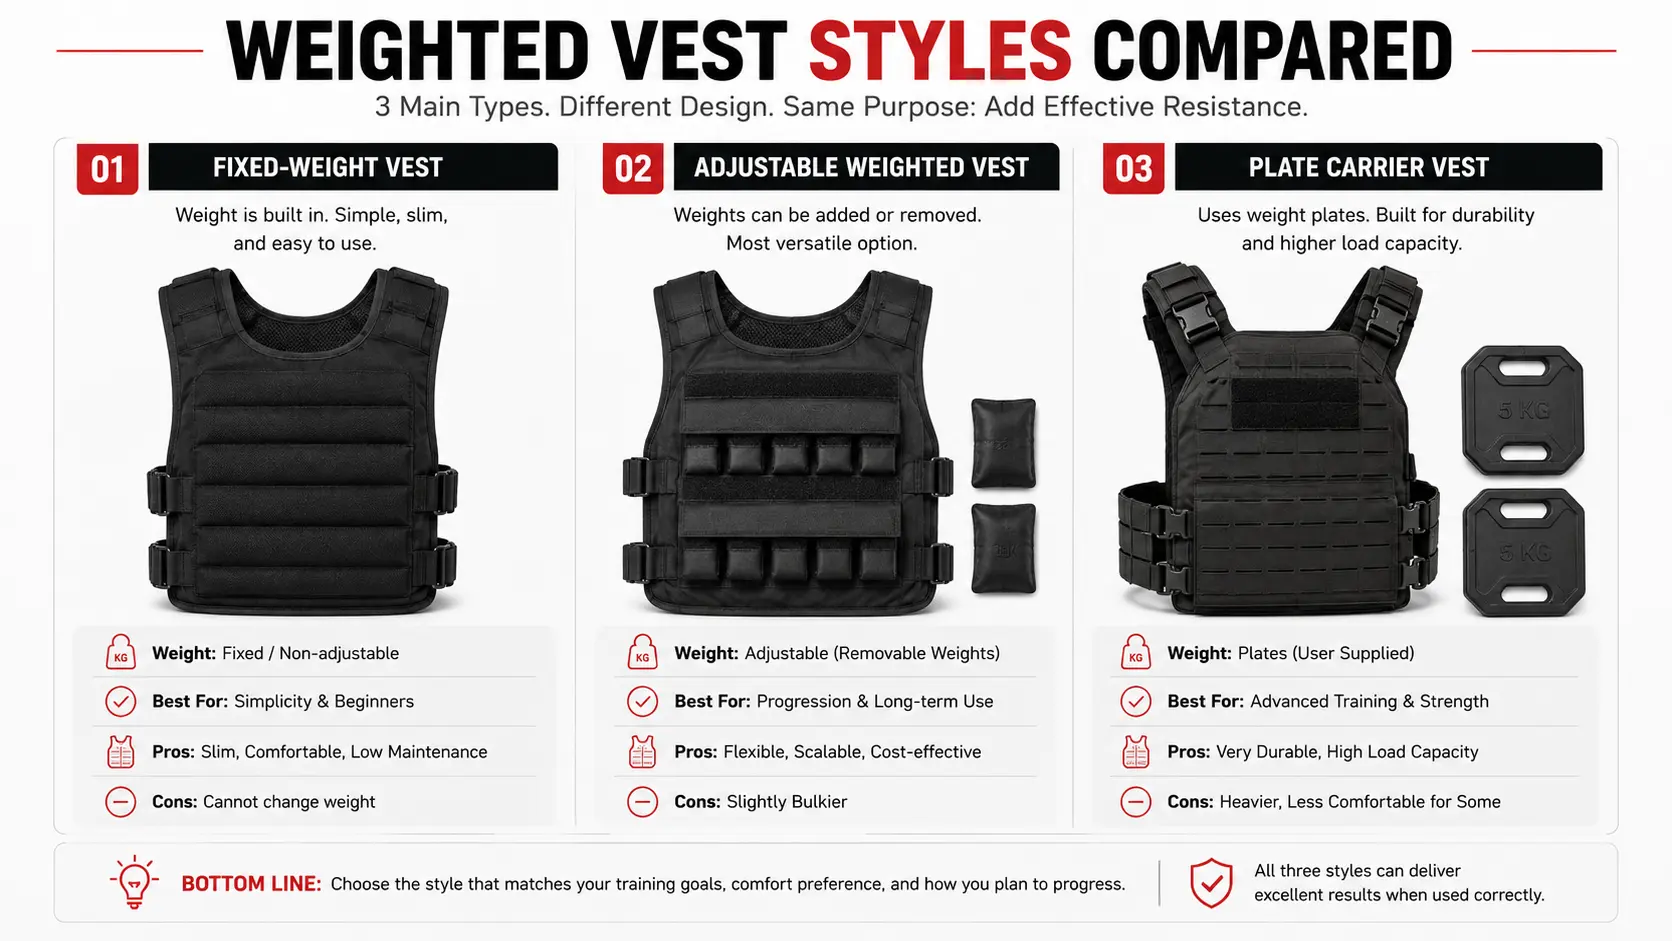
Fixed-Weight Vest
The resistance is built into the vest and is not intended to be changed between sessions. You choose the total weight when buying the vest, then train with that same load.
Adjustable Pocket Vest
Small removable weights sit in pockets distributed around the vest. You can add or remove resistance as your training changes.
Plate Carrier Style
Fitness plate-carrier designs use larger removable weight plates rather than many small pocket weights. The load is usually concentrated across larger front and back areas.
Low Profile Is About How the Vest Sits and Moves
A low-profile vest keeps the resistance relatively close to the torso and reduces unnecessary bulk. That can be useful when arm swing, faster movement, or freedom around the shoulders matters.
Low-profile does not automatically mean light, and it does not automatically mean adjustable. Check the actual weight system, fit range, and load capacity rather than choosing from the silhouette alone.
Weighted Vest Type Comparison
Use this as a decision framework rather than a ranking. The right design is the one that matches your activity, progression needs, and preferred fit.
| Type | Load System | Best Fit For | Main Strength | Main Tradeoff |
|---|---|---|---|---|
| Fixed Weight | Built-in resistance | Simple walking or consistent-load sessions | Fast, simple setup | Little or no load adjustment |
| Adjustable Pocket | Multiple removable small weights | Progressive walking, strength, and mixed training | Fine control over resistance | More setup and potential bulk |
| Plate Carrier Style | Larger removable weight plates | Conditioning and plate-based loaded training | Dense, scalable resistance | More rigid feel on some designs |
| Low-Profile Design | Fixed or adjustable | Movement where reduced bulk is a priority | Close-to-body feel | Design alone does not tell you load range |
Low-profile is included in the table because it matters when shopping, but it can overlap with fixed-weight and adjustable-weight systems.
Which Style Makes the Most Sense for You?
I want one simple load for regular walking.
I want to increase or reduce resistance regularly.
I prefer dense plate-based loading for conditioning.
I care strongly about reduced bulk and free movement.
Once the vest is chosen and fitted, the next question is how to use it for the first time.
How to Use a Weighted Vest for the First Time
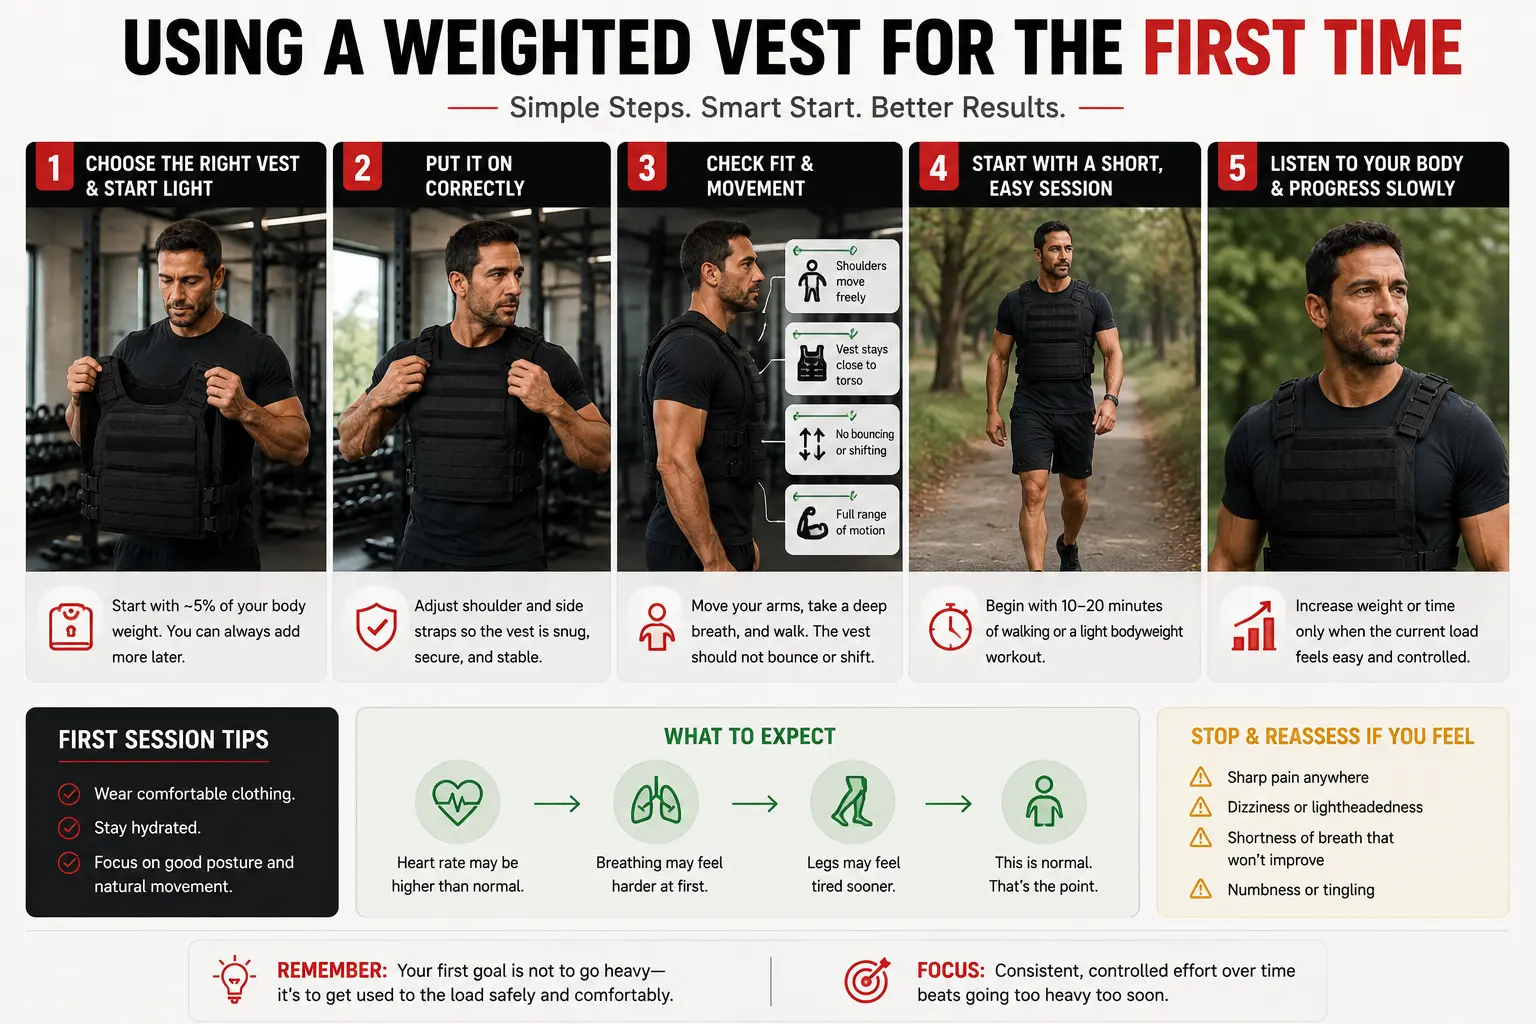
The easiest way to judge a new weighted vest is to keep the rest of the session familiar. Use an activity you already know, start with conservative resistance, secure the fit, and give yourself enough room to notice how the added load changes your movement.
Choose an activity you can already perform comfortably without added weight.
Use less resistance than the maximum amount the vest can carry.
Leave room to evaluate fit, movement, breathing, and recovery before doing more.
Build the First Session Around Control
Each step answers one question before you move to the next. If something feels wrong early in the process, fix that before adding more time, speed, or resistance.
Choose an Activity You Already Know
Your first weighted-vest session is not the best time to learn a new exercise. Start with something familiar, such as an easy walk or a bodyweight movement you already perform with consistent form.
Start Lighter Than Your Ego Wants
The first session should help you understand how the vest changes the activity. You do not need to begin near the vest’s maximum capacity.
For a beginner adapting to weighted-vest exercise, ACSM suggests roughly 5% of body weight as an initial reference. That is a starting point to evaluate, not a requirement to reach.
Adjust the Fit Before You Start Moving
Set the shoulder, side, waist, or sternum adjustments available on your vest so the load stays close to your torso.
Walk a few steps, raise your arms, take several normal breaths, and perform a simple squat before starting the actual session.
Make the First Session Shorter Than Normal
Your normal unweighted workout duration does not need to become your first weighted duration. A shorter session makes it easier to judge how the load affects movement, breathing, pressure points, and recovery.
Increase One Variable at a Time
When the current setup feels controlled, choose one thing to progress. That might be vest weight, session duration, walking pace, incline, or exercise difficulty.
Changing one variable makes it easier to tell what caused a session to become harder and whether your movement quality stayed intact.
Check Your Form Before Calling It Progress
Added resistance is only useful if the movement still matches the purpose of the exercise. Watch for posture changes, shorter range of motion, altered stride, excessive forward lean, or repeated vest movement.
If your technique changes before the exercise becomes usefully harder, reduce the resistance or correct the fit before progressing.
A Simple First Weighted Walking Session
Make sure you feel comfortable with your normal walking pattern before adding the vest.
Use conservative resistance that does not immediately change your posture or stride.
A brief introductory session gives you time to evaluate the vest without overcommitting.
Do not increase speed simply because you are wearing extra weight.
Notice bounce, shoulder pressure, breathing, arm swing, and changes in stride.
Decide whether the next session should stay the same before increasing anything.
Three Questions Decide What Happens Next
If not, solve the fit problem before adding load.
If not, the activity, fit, or resistance needs adjustment.
If yes, repeat or cautiously progress one variable.
Now that the first-session process is clear, we can look at the activities where a weighted vest is most useful.
Best Ways to Use a Weighted Vest
Weighted vests work best when added to activities that already make sense without the vest. Walking, bodyweight strength work, stairs, incline training, and some conditioning sessions can all use added torso load effectively. Faster and more technical activities require more caution.
Learn the vest with a controlled first session before using it for more demanding activities.
Walking Is the Simplest Place to Start
Walking gives you a controlled way to feel how added torso load changes exercise demand without introducing a highly technical movement.
Controlled research shows that weighted-vest walking can increase metabolic cost and relative exercise intensity compared with walking under similar conditions without added load.
That makes walking useful when you want to increase the demand of a familiar activity without immediately relying on faster movement. Load, pace, incline, duration, and individual fitness still influence the actual response.
Rucking and Ruck-Style Conditioning
Traditional rucking uses a loaded backpack or rucksack. A weighted vest is another way to perform loaded walking, but the resistance is positioned differently around the torso.
A vest can be useful when you prefer hands-free loading that stays close to the body. It should not be assumed to feel identical to carrying the same number of pounds in a backpack.
Add Resistance to Familiar Exercises
Squats, split squats, lunges, push-up variations, step-ups, and similar bodyweight movements can become more demanding when external load is added through a vest.
The vest is most useful when the movement still looks like the unloaded version. Extra resistance is not an improvement if it forces you to shorten useful range of motion or lose technique.
Increase Demand Without Chasing Speed
Stairs and incline walking already make locomotion more demanding. Adding a vest gives you another variable to control without requiring faster movement.
Do not raise incline, pace, session duration, and vest weight together. Establish control at the current setup, then progress one variable.
CrossFit and Mixed Conditioning Sessions
Weighted vests are sometimes used in conditioning workouts that combine running, squats, pull-ups, push-ups, step-ups, or other repeated movements.
In a randomized study using CrossFit-style prescribed vest loads, added resistance increased physiological stress and carbohydrate oxidation. The study did not find changes in the measured spatiotemporal gait parameters.
Running Is Not the Best First Weighted-Vest Activity
Running combines faster movement with repeated impact and gives you less time to correct a vest that shifts, bounces, or changes position.
Experimental research has also found changes in aspects of running mechanics under different vest-loading conditions. That is another reason not to treat added running load as automatically beneficial.
If weighted running has a specific place in your training, use a stable vest, conservative resistance, and an established unloaded running base.
Which Activities Make the Most Sense?
This is a practical starting framework, not a universal ranking. Your experience, fit, load, and training goal still matter.
| Activity | Beginner Fit | Main Reason to Use It | Main Thing to Watch |
|---|---|---|---|
| Walking | Excellent | Increase demand while keeping movement simple | Fit, stride, bounce |
| Ruck-Style Loaded Walking | Good | Hands-free loaded walking | Load placement and total resistance |
| Bodyweight Strength | Good | Progress familiar bodyweight exercises | Range of motion and technique |
| Stairs / Incline | Good | Raise walking demand without chasing speed | Combining too many progression variables |
| CrossFit / Conditioning | Experience Helps | Add resistance to mixed conditioning | Fatigue and movement quality |
| Running | Higher Caution | Specific resisted-running stimulus | Running mechanics and vest stability |
A weighted vest is useful in many situations, but there are also times when it is the wrong tool or simply too heavy.
When a Weighted Vest Is the Wrong Tool
A weighted vest is useful only when the extra resistance supports the purpose of the session. If the load changes your movement, overwhelms the exercise, or creates problems that were not present without the vest, adding more weight is not useful progression.
A Vest Can Be Manageable for One Exercise and Too Heavy for Another
Ten pounds during a controlled walk, a set of squats, and a run do not create the same training demand. Speed, impact, exercise complexity, fatigue, and vest stability all change how the resistance affects the activity.
Five Situations Where the Vest May Be the Wrong Tool
Sometimes the correct adjustment is not a lighter vest. Sometimes the better decision is to perform the activity without added torso load.
You Do Not Control the Unloaded Movement Yet
If a squat, lunge, push-up, step-up, walk, or another movement is already inconsistent without the vest, extra resistance can make it harder to identify and correct the underlying movement problem.
You Cannot Make the Vest Stay Secure
Repeated bouncing, sliding, or riding into the neck can distract from the activity and change how the load moves against your body.
The Vest Interferes With the Purpose of the Exercise
Added resistance is not automatically useful. If the vest blocks useful range of motion, changes the intended technique, or makes managing the equipment more important than the exercise itself, remove it.
The Session Is Already Progressing in Several Ways
A harder incline, faster pace, longer duration, more difficult exercise, and heavier vest all add training demand. Combining several major changes at once makes it difficult to judge what is causing fatigue or technique breakdown.
You Are Wearing It All Day Because More Time Seems Better
A weighted vest can be useful training equipment, but that does not mean continuous wear is automatically better. Daily life includes repeated sitting, reaching, twisting, bending, and other movements that are not part of a controlled training session.
ACSM specifically cautions that continuous all-day vest use may increase the possibility of musculoskeletal strain or joint problems because of the varied movements performed throughout the day.
Signs Your Weighted Vest May Be Too Heavy
There is no single pound value that identifies a universally correct load. Look instead for patterns showing that the resistance is disrupting the movement, fit, or recovery more than it is helping the session.
Your Technique Changes Before the Exercise Becomes Usefully Harder
Watch what happens to the movement when the vest goes on. A noticeable forward lean, shortened stride, reduced range of motion, rushed repetitions, or a different movement pattern can indicate that the current load is too aggressive for that activity.
A fit that seemed acceptable at the start may become unstable once your posture or movement changes under fatigue.
If the session immediately becomes a struggle to preserve basic movement quality, the added load may be too aggressive.
Excessive compression around the torso or shoulders can signal a fit problem, an unsuitable design, or too much resistance for the current setup.
New or increasing pain is a reason to stop the loaded activity and reassess rather than simply continuing through it.
If a modest weighted session repeatedly disrupts later training more than expected, the load, duration, exercise choice, or progression may need to be reduced.
Is It a Fit Problem, a Load Problem, or an Activity Problem?
Fit Problem
The vest moves independently of your torso, rides upward, creates pressure points, or cannot be secured comfortably.
Load Problem
The vest fits correctly, but normal technique, posture, pace, or range of motion deteriorates when the current resistance is added.
Activity Problem
The vest and load feel controlled in simpler movements, but become distracting or disruptive during a specific exercise.
Use This Four-Step Reset
Do not increase pace, incline, repetitions, or time.
Confirm that the vest is stable and not overly tight.
Remove weight if the current load changes the movement.
Repeat the activity only when normal control returns.
Training Effort and Warning Signs Are Not the Same Thing
- Higher effort than the unloaded version
- Increased breathing appropriate to the activity
- Working muscles fatigue while technique stays stable
- Vest remains secure during movement
- New or increasing pain
- Loss of normal movement or balance
- Vest compression that interferes with normal breathing
- Dizziness, faintness, chest discomfort, or severe or unusual shortness of breath
Some people should get individualized guidance before adding weighted-vest resistance.
Who Should Get Professional Guidance Before Using a Weighted Vest?
Many adults can approach weighted-vest training conservatively, but some situations deserve more individualized planning. Existing pain, elevated fracture risk, balance limitations, recent surgery, rehabilitation restrictions, or cardiovascular concerns can change which activities, loads, and progression methods are appropriate.
Some People Need a Better Starting Point, Not a Blanket Ban
A healthcare professional or qualified rehabilitation professional can help determine whether added torso load fits your current situation, which activities make sense, and whether weighted-vest training belongs in the current stage of your exercise plan.
Five Situations That Deserve Extra Guidance
These are not automatic disqualifiers. They are situations where a generic body-weight percentage or beginner routine may not provide enough information for a sensible starting decision.
Added Load Should Not Be Your Way of Testing an Injury
If walking, squatting, running, or another planned activity already causes pain without the vest, adding external resistance is not a reliable way to determine what the underlying problem can tolerate.
Bone Health Requires More Than Simply Adding Weight
If you have osteoporosis, a history of spine fracture, previous spine surgery, or a high risk of fracture, weighted-vest decisions should be individualized.
Load placement, vest fit, movement selection, and existing fracture precautions can all affect whether weighted-vest exercise is appropriate.
Get the Movement Stable Before Making It Heavier
If you already have difficulty with balance, walking, stairs, direction changes, or sit-to-stand movements, it is reasonable to get individualized guidance before adding external torso load.
Depending on the situation, balance, mobility, strength, or fall-risk reduction may deserve attention before weighted resistance is introduced.
Recovery Plans Already Have Their Own Progression
After surgery or during active rehabilitation, strength, mobility, walking, and resistance are often progressed according to the recovery plan. A weighted vest adds another loading variable that may not belong in the current phase.
Added Load Can Increase Exercise Demand
If you have a diagnosed cardiovascular condition, have recently had a heart-related procedure, or have been given specific exercise restrictions, talk with your healthcare team before adding a new resistance method.
Your healthcare team can help determine appropriate exercise intensity and identify symptoms that should change or stop the session.
Match the Question to the Right Professional
The professional you need depends on why you are seeking guidance. Product fit, rehabilitation, medical clearance, and general training progression are different questions.
Healthcare Professional
Appropriate when the question involves a diagnosed medical condition, cardiovascular concern, fracture risk, medication-related issue, recent procedure, or an existing medical restriction.
Physical Therapist
Especially useful when the main concern is pain, movement quality, mobility, balance, rehabilitation, return from injury, or post-surgical progression.
Qualified Exercise Professional
Useful for organizing an appropriate training plan around practical variables such as resistance, session duration, progression, and exercise selection.
“Not Yet” and “Not This Way” Are Different From “Never”
Get enough information to understand what added load means for your specific situation.
The answer may be a lighter load, shorter duration, different exercise, or a different vest design.
Progress only when the current activity and resistance remain appropriate and controlled.
Ask Yourself These Four Questions
Existing or recurring pain deserves attention before adding resistance.
Added load should not be the first solution for an unstable movement.
Existing restrictions should take priority over a generic weighted-vest routine.
Uncertainty around a health, injury, balance, or recovery issue is a reasonable reason to ask first.
With safety and suitability covered, the next section looks at the most common mistakes people make when training with a weighted vest.
Common Weighted Vest Mistakes
A weighted vest is simple equipment, but it still introduces another training variable. Most avoidable problems come from starting too heavy, progressing too quickly, ignoring fit, or adding the vest to an activity where extra resistance does not improve the training.
Earn the Next Progression
A heavier vest, longer session, faster pace, steeper incline, or harder exercise should come after the current setup feels controlled. Difficulty alone is not proof that the progression was appropriate.
What Goes Wrong, Why It Matters, and What to Do Instead
Starting Too Heavy
A common first mistake is treating the maximum capacity of a vest as a sensible starting load. The equipment may be capable of holding that resistance, but your first session does not need it.
Review the starting-weight guideToo much starting resistance can change posture, stride, exercise technique, comfort, and the fatigue created by the session.
Adding Weight Before Fixing the Fit
A vest that already shifts, bounces, rides into the neck, or hangs loosely will usually become more distracting when additional resistance is added.
Review the sizing and fit guideMore resistance can magnify a fit problem instead of making the workout more productive.
Using the Same Load for Every Activity
A load that feels controlled during walking may feel completely different during stairs, lunges, conditioning circuits, or running.
Speed, impact, exercise complexity, range of motion, and fatigue all influence how external resistance affects movement.
Making Everything Harder at Once
Increasing vest weight while also increasing session duration, walking pace, incline, exercise difficulty, or total training volume creates several new demands at the same time.
If movement or recovery worsens, several simultaneous changes make it harder to identify which progression caused the problem.
Wearing the Vest All Day Because More Seems Better
A defined weighted workout and wearing extra load throughout the day are not the same thing. Daily life includes sitting, bending, reaching, twisting, stairs, and many other uncontrolled movements.
ACSM cautions that continuous wear combined with varied daily twisting and turning may create possible musculoskeletal or joint risk.
Choosing Maximum Capacity Instead of Useful Capacity
A very high maximum capacity can sound more versatile, but capacity is useful only when the vest’s fit, loading increments, profile, and adjustment range suit your actual training.
Extra capacity can come with bulk, rigidity, or cost that provides little benefit if your useful working range is much lighter.
Assuming Harder Automatically Means Better
A workout can become much more difficult simply because the vest is too heavy, unstable, or poorly matched to the exercise.
Difficulty is useful only when it supports the training goal while preserving enough control to perform the activity properly.
Change One Major Variable, Hold the Others Steady
Five Questions Catch Most Mistakes Early
Check stability before adding intensity.
Do not copy one load across every movement.
Be able to name one clear change.
Added resistance should not rewrite the movement.
More weight is not a training goal by itself.
With the major mistakes covered, the next step is turning these principles into a simple beginner progression plan.
Beginner Weighted Vest Progression Plan
A beginner progression does not need to be aggressive. The first phase should help you establish a secure fit, normal movement, manageable wearing time, and predictable recovery. Once those pieces remain consistent, you have a better reason to change the training.
Progress From Familiarity to Controlled Loading
Fit, feel, and basic tolerance
Build consistency before changing load
Change one major variable
Prove the new setup is repeatable
Establish Fit and Tolerance
Keep the first phase intentionally simple. Use a familiar activity, conservative resistance, and enough time to learn how the vest changes the movement.
The 5% and 10-minute references above come from ACSM’s beginner weighted-vest guidance. They are starting references, not targets every reader must use.
Read the ACSM guidanceLearn the fit. Check shoulder pressure, torso contact, breathing, arm swing, and bounce.
Keep the pace familiar. Do not turn the first loaded walk into a speed test.
End with control. Learn how the load feels before fatigue begins changing the movement.
Repeat Before You Add More
A successful first session does not require an immediate weight increase. Repeat the basic setup so you can see whether fit, movement, and recovery remain predictable.
Repeat a successful setup. Consistency gives you a better baseline than changing the vest every session.
Extend time gradually. If the current duration remains controlled, wearing time can be the next progression.
Keep the load stable. You do not need a heavier vest and a longer session at the same time.
Choose One Progression
If the previous setup is repeatable, make the training slightly harder by changing one primary variable. Keeping the other variables similar makes the response easier to evaluate.
Keep weight, pace, and terrain similar.
Keep duration and activity similar.
Keep load and pace controlled.
Know what changed. You should be able to name the one major progression being evaluated.
Watch movement first. If posture, stride, or control deteriorates, reverse the progression.
Do not chase a percentage. The next number matters less than whether the movement remains controlled.
Make the Progression Repeatable
Phase four is not automatically another load increase. Use it to confirm that the current progression still works after you have repeated it more than once.
Repeat the progression. One controlled session is useful. Repeated controlled sessions give you more information.
Check later-session form. A setup may feel stable initially but become less controlled as fatigue increases.
Choose the next cycle. Progress, repeat, or reduce based on what the current setup actually showed you.
Pass These Checks Before Making the Session Harder
Progress should be based on what the current setup allows you to do rather than simply because another week has passed.
The vest stays close to the torso without distracting bounce or shifting.
Posture, stride, useful range of motion, and technique remain recognizable.
The activity is harder without becoming a fight against the equipment.
The progression is not creating new or increasing pain that suggests the setup should be stopped and reassessed.
The session does not repeatedly disrupt your normal training more than expected.
Progress, Repeat, or Reduce?
You do not need to increase the load after every good session. Choose the response that matches what actually happened.
Progress
Choose this when the current setup is repeatable, movement remains normal, the vest stays stable, and recovery is appropriate.
Repeat
Choose this when the session was controlled but the current setup still feels meaningfully challenging, unfamiliar, or worth practicing again.
Reduce
Choose this when fit deteriorates, movement changes, pain develops or increases, or the session creates fatigue that is not useful for the training goal.
Do Not Let the Calendar Make the Decision for You
What Success Should Look Like
The final buying decision still depends on the features that make a weighted vest comfortable and practical for your training.
What to Look for When Buying a Weighted Vest
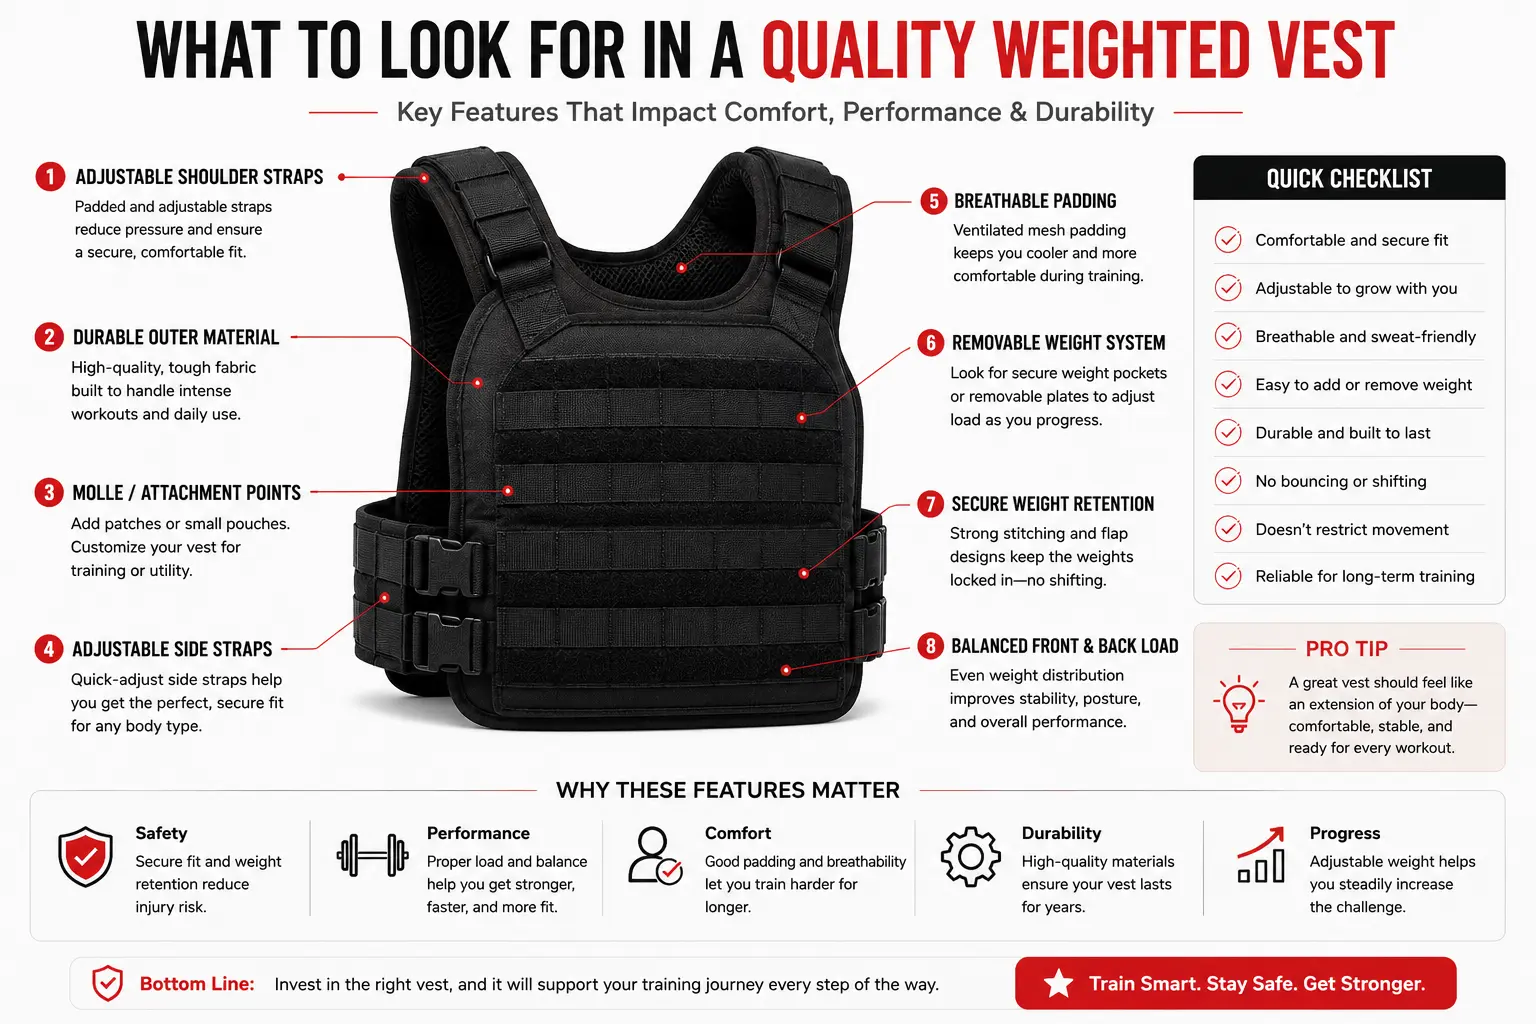
Maximum weight is only one specification. A useful weighted vest also needs to fit your body, stay stable during movement, hold its resistance securely, and give you an appropriate way to progress. The right features depend on whether you plan to walk, strength train, condition, or use the vest across several activities.
Think in This Order Before Comparing Products
What will you actually do in the vest?
Will it stay secure on your body?
What resistance range do you really need?
How easily can you change that load?
Can you use it without fighting the vest?
Check These Before You Compare Prices
Not every vest needs every premium feature. The goal is to identify which features directly affect your intended training.
Can You Secure the Vest to Your Body?
A useful size chart should help you judge whether the vest matches your torso and chest dimensions. The adjustment system then needs enough range to keep the vest close to your body without excessive compression.
Review the weighted vest sizing and fit guideCan the Load Change With Your Training?
Adjustable designs are useful when you want one vest for several activities or expect to increase resistance gradually. Fixed-weight designs can still make sense when you want one simple and consistent load.
Compare fixed, adjustable, and plate-loaded vestsHow Large Is Each Progression Step?
Two adjustable vests can have the same maximum capacity but very different progression options. Smaller removable increments give you finer control when increasing resistance gradually.
Where Does the Weight Sit?
Look at how resistance is distributed across the front, back, and sides of the vest. A balanced layout can make the load easier to manage than a design that concentrates more resistance than you prefer in one area.
Will the Vest Stay Close While You Move?
Walking may tolerate more vest movement than faster conditioning, but excessive bounce can become distracting in almost any activity. Secure adjustment and appropriate sizing help keep the load closer to your torso.
Will the Contact Areas Suit Your Training?
Padding can reduce concentrated pressure around the shoulders and torso, while breathable or mesh-backed materials may make warm sessions more comfortable. Extra padding is not automatically better if it also adds unwanted bulk.
Are the Load-Bearing Parts Built to Stay Secure?
Removable weights need pockets, closures, straps, or retention systems that keep them where the vest was designed to carry them. Stitching, buckles, seams, and load-bearing fabric also deserve attention.
Do You Need the Vest’s Maximum Load?
A larger maximum capacity can create future progression room, but it can also bring extra size, structure, or cost. Buy enough capacity for your realistic training range rather than treating the highest number as the best specification.
Review the starting-weight guidanceDifferent Uses Change Which Features Matter Most
You do not need to rank every feature equally. Prioritize what affects the movement you plan to perform most often.
Prioritize Comfort and Easy Progression
- Secure but comfortable torso fit
- Breathable contact areas
- Useful weight increments
- Easy loading and unloading
Prioritize Stability and Movement Freedom
- Secure torso adjustment
- Useful progression range
- Arm and shoulder clearance
- Stable weight pockets or plates
Prioritize Bounce Control
- Snug adjustment system
- Low movement of the load
- Secure insert retention
- Breathable contact areas
Prioritize Adjustability
- Removable resistance
- Small useful increments
- Wide adjustment range
- Convenient weight changes
Useful Specification or Marketing Number?
- Actual size measurements
- Empty vest weight
- Included resistance
- Smallest removable increment
- Maximum supported load
- Adjustment locations
- Pocket or plate compatibility
- Material and padding details
- “One size fits all”
- “No bounce” without fit details
- “Maximum comfort” without material information
- Very high capacity presented as automatically better
- “For every workout” without explaining load changes
- Product weight listed without clarifying included load
Eight-Point Weighted Vest Shopping Checklist
See Our Research-Based Weighted Vest Picks
Compare recommended weighted vests by training purpose, fit, loading system, verified specifications, limitations, and overall value.
The remaining questions are the practical ones people ask most often before buying or using a weighted vest.
Weighted Vest FAQs
If you have read this far, you already understand the main principles. Start conservatively, prioritize fit, match the load to the activity, and progress only when movement stays controlled. These answers bring the most common questions together in one place.
Roughly 5% of body weight can be an initial reference.
Stable against the torso without restricting movement.
Change one major training variable at a time.
More resistance is not useful when normal movement disappears.
Practical Answers Before You Add More Weight
Roughly 5% of body weight can be a useful starting reference for a beginner who is otherwise appropriate for the activity. It is not a mandatory target. If the vest changes your posture, stride, balance, or exercise technique, use less resistance.
ACSM uses about 10 minutes of weighted walking as an introductory reference for sedentary or beginner clients, followed by gradual increases in wearing time as the workload becomes better tolerated.
You do not need to match the duration of your normal unweighted workout during the first few sessions.
It can be. Research has shown that adding a weighted vest can increase the metabolic cost and relative exercise intensity of walking compared with walking without the vest.
That does not mean heavier is automatically better. The load still needs to preserve normal posture, stride, balance, and comfort.
A weighted vest can increase the energy cost of activities such as walking, but that does not mean wearing one automatically produces meaningful long-term fat loss.
Treat the vest as a way to change exercise demand, not as a standalone weight-loss method.
Simply wearing a weighted vest does not automatically build muscle. The vest can, however, add resistance to exercises such as squats, split squats, lunges, step-ups, push-ups, and other suitable bodyweight movements.
Whether that contributes to muscle growth depends on the overall training stimulus, progression, exercise selection, and recovery.
Weighted running is used in some training programs, but a beginner does not need to start there. Running already adds speed, repeated impact, and higher exercise demand.
Controlled walking is usually a simpler way to learn how the vest fits and how you respond to added torso load before considering faster movement.
It should feel snug and stable against your torso without excessive bouncing or sliding. At the same time, it should not restrict normal breathing, arm movement, or the range of motion required for your activity.
You do not need to wear a weighted vest every day to make it useful. Training frequency should reflect the activity, resistance, session duration, and how well you recover.
Continuous all-day wear is a separate issue. ACSM cautions that repeated twisting, turning, and varied daily movement while continuously loaded may create a possible risk of musculoskeletal strain or joint problems.
Do not assume weighted-vest walking will automatically improve bone density. The Bone Health & Osteoporosis Foundation says the evidence that weighted-vest exercise improves bone mineral density or prevents fractures remains uncertain.
People with osteoporosis, previous spine fracture, spine surgery, or high fracture risk should get individualized guidance before starting weighted-vest exercise.
Adjustable vests usually make more sense when you want progressive loading or plan to use different resistance levels for walking, strength work, and conditioning.
A fixed-weight vest can still be a good choice if you want one simple load and do not expect to change resistance regularly.
Research and Safety References Used in This Guide
These references support the main loading, walking, progression, bone-health, and exercise-safety points discussed throughout this article.
-
Practical Guidance American College of Sports Medicine
Beginner starting load, introductory weighted walking time, gradual progression, vest features, and continuous-wear considerations.
View ACSM weighted vest guidance -
Walking Research Puthoff et al., Medicine & Science in Sports & Exercise
Study examining how weighted-vest loading changes metabolic cost, relative exercise intensity, and skeletal loading during walking.
View study on PubMed -
Bone Health Research Beavers et al., 2025 Randomized Clinical Trial
A 12-month trial examining weighted-vest use and resistance exercise during weight loss in older adults with obesity, including hip bone-loss outcomes.
View trial on PubMed -
Bone Safety Bone Health & Osteoporosis Foundation
Current guidance on uncertain weighted-vest bone-density evidence and additional caution for people with spine fracture, spine surgery, or high fracture risk.
View BHOF guidance -
General Progression U.S. Physical Activity Guidelines
Federal guidance supporting gradual progression from small amounts of activity for people who are currently inactive.
View current federal guidelines -
Exercise Safety MedlinePlus, U.S. National Library of Medicine
General exercise guidance covering gradual progression and stopping activity for pain, extreme shortness of breath, dizziness, or feeling unwell.
View MedlinePlus guidance -
Urgent Warning Signs American Heart Association
Heart attack warning signs including chest discomfort, shortness of breath, nausea, sweating, and lightheadedness, with U.S. emergency-response guidance.
View AHA warning signs
A Weighted Vest Works Best When the Basics Stay Simple
You do not need the heaviest vest, the longest session, or the fastest progression to use weighted resistance effectively. You need a vest that fits, a load you can control, an activity that makes sense, and a progression you can repeat.
Compare Our Research-Based Weighted Vest Picks
If you now know the load, fit, and features you need, compare our current weighted vest recommendations by training goal, fit system, loading method, verified specifications, limitations, and overall value.